

DIY Electrical Wiring
Sometimes I Like to Pretend I’m an Electrician
You know the feeling when you shuffle your feet on the carpet and then (accidentally!) touch the cat? (Sorry, Egor…) Touching a live wire is not like that. It’s more of a pulse than a shock. If you were thinking you might like to try it, my advice would be… do not. (I may have just saved your life. You’re welcome.)

So, why was I playing with electricity? Well, my crappy house had crappy wiring, of course. Aluminum…
Why is aluminum wiring bad? Every connection made with an aluminum wire is a potential fire waiting to happen. Scary, right? I know! Basically, aluminum oxidizes when exposed to air which creates resistance which creates heat which can create fire. I am emphatically anti-fire when it comes to my crappy house, so I decided to take advantage of my open walls and replace all of the wiring with copper. And since I was running new wiring, I thought it would be nice to get rid of the boob lights in my kitchen.

If you’ve never noticed that before, get ready to start seeing boobs on ceilings everywhere you go. (You’re welcome again.)
I decided to put recessed lights in the kitchen instead. But why stop there? How about some pendant lights over my someday island? Oh, and under cabinet lighting? And some recessed lights in the living room? And wouldn’t it be convenient to put them all on 3-way switches? Ooo, and dimmers! I love dimmers… So, I made a lighting plan.
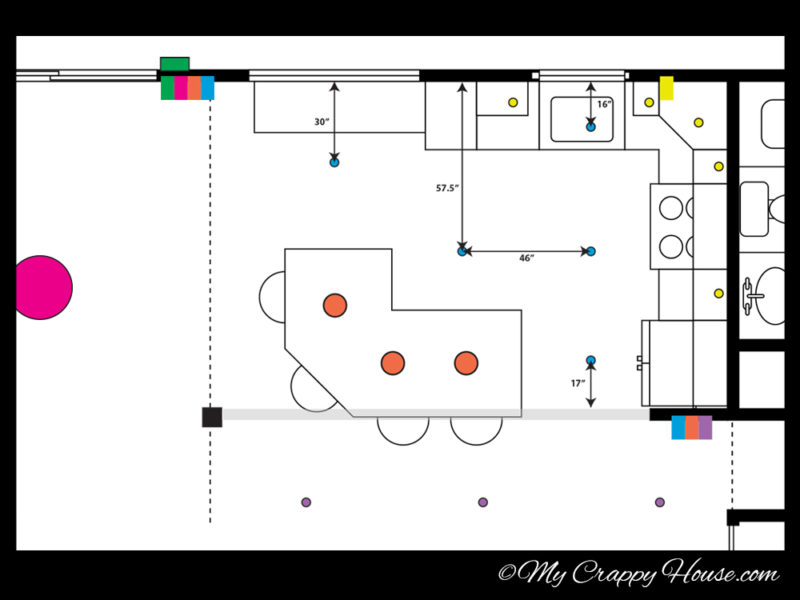
Color coded and everything. That’s how I roll.
It’s not so easy trying to guess where the lights should be when you’re just looking at a big room with open walls. I wish I was psychic and could know exactly how the lights will look once my house is put back together. (Hell, if I’m psychic, I’m totally picking winning lottery numbers and buying a different, not crappy house…)
It won’t really matter if my recessed lights are a little off, but the pendants really need to be placed precisely over the island. I fell in love with these lights from Corbett. They cost a ridiculous amount of money. I’m hoping that, by the time I’m ready to buy pendants, these will be on clearance.
Hey, it could happen. You don’t know.

I made some paper pendants and a cardboard island to get the light placement just right. If only building a kitchen were this easy…

So with my plan in mind, it was time to go crawling up in the attic to install some fixture boxes. The first time I went in my attic was like going into the house from The Shining. I had an assortment of weapons tools, protective clothing, knee pads, a head lamp, and of course, my phone in case I got lost (or abducted). I called my parents before my first ascension to tell them to call the police if I didn’t call them back within an hour. It wasn’t too bad. I’m proud to call myself an Attic Survivor. (I got the t-shirt.) I go up there all the time now. The ghosts are friendly.
I had some help running wire. It’s a two person job. Also, I’m not brave stupid enough to attempt to wire into the electrical panel. I had someone with a little experience do that part. I did, however, wire all of the switches and outlets myself. Exhibit A:


Check me out! See those little green lights? That means they’re working! Shocking, right? No, not shocking, actually. Just awesome. Here are a couple of pictures taken after the wiring was in place.


The ceiling in the kitchen was very crappy, but replacing a ceiling in a 40 year old house would be disgusting. The logical thing to do was drywall right over the existing ceiling to make it all pretty and smooth, as well as up the R-value. (That’s contractor speak for ‘make it more insulated’.)
The only problem was that the clips on my can lights were only adjustable up to 1/2″ thick drywall. The original ceiling was 3/8″ thick, so that’s a total of 7/8″ with the new layer – too thick for the clips.
Clever girl that I am, I cut seven inch holes in the existing ceiling where I wanted the lights to be. When my cousins installed the new layer over the ceiling (what, you didn’t really think I could hold a piece of sheetrock over my head, did you?), they cut the proper four inch holes to accommodate the cans so the clips would only be attaching to the new drywall.
If that’s confusing, I made a little drawing to illustrate my brilliance:

This worked out perfectly. Here’s how it looked after the new layer of drywall. (Thanks to cousins Tommy and Johnny for rocking!)


Installing recessed lights is not especially difficult. Engaging the clips with my weak little bird hands was a bitch, but otherwise I didn’t have any trouble. Here’s the final result:

And with the flip of a breaker, let there be light!
Like! Share! Subscribe!

6 Comments
Teena Free
You amaze me with every new blog! It’s going to pay off someday in a big way! I feel it!
I am so looking forward to the finish line!
My Crappy House
That makes two of us!
Electrician
Looks good. Make sure you use the right size breaker for the size of wire you’re using. 14 AWG wire should only be used with a 15 amp breaker. 12 AWG wire is for 20 amps. You could use 12 AWG with a 15 amp breaker but don’t use 14 AWG on a 20 amp.
My Crappy House
Thanks! Yes, I definitely do have the correct breakers for the different gauge wires. I had an electrician wire everything into the panel. I’ll wire up switches and outlets, no problem. But the panel scares me a bit… Thanks for checking my work
electrician baltimore
I will be waiting for pictures of your kitchen with your new lighting system. Your kitchen doesn’t look that crappy at all. Very nice layout plan of electrical lights. Like the color coding idea.
My Crappy House
Thank you! The color coding definitely helped me work things out and keep my plan straight. I’m afraid my kitchen will probably be a 2015 project, but I’ll be doing lots more stuff in the meantime so I hope you’ll still visit!