

A Really Cool Copper Technique
Copper Boom!
In junior high, I took shop class with Mr. Klahn. Not only was it so much fun, but it was also where I first learned how to use power tools. And just look at me now with the mad skills! It’s a shame so many schools are doing away with shop class. As an adult, I use what I learned in shop way more than I ever use calculus. (I never use calculus.) But, I digress. One of the projects we did was this really cool copper technique and I’d been meaning to try it again. It only took me 30 years to get around to it.
Hey, I’m busy, OK?

My honey does not like to sit idle. We are total opposites in that way. He’s always got to be doing something active, while I am content to park my ass on the couch and accomplish the Netflixing. (No, I do not binge-watch. That sounds like a television consumption disorder. I power-watch. I actively achieve television, in record time. My way is productive.)
Anyway, this is his latest project (in progress); a wooden box with doors. (I’ll let you try to guess what it is before I reveal that later in this post.)

The plans for his project called for a metal insert in the doors. They suggested weathered steel, but I thought this was the perfect opportunity to try that super cool copper technique I garnered from my childhood shop days.

I already had some copper on hand that I bought 25 years ago in anticipation of this very project. (OK, not this very project, but… Hey! Busy! And also, not psychic.)
So, what’s the freaking project? (I know, you must be getting so annoyed by now. I’m like those recipe bloggers that make you read their whole damned life story before actually getting to the stupid recipe and by then you’re not even freaking hungry anymore.) I’m sorry. We’re almost there. Keep reading…

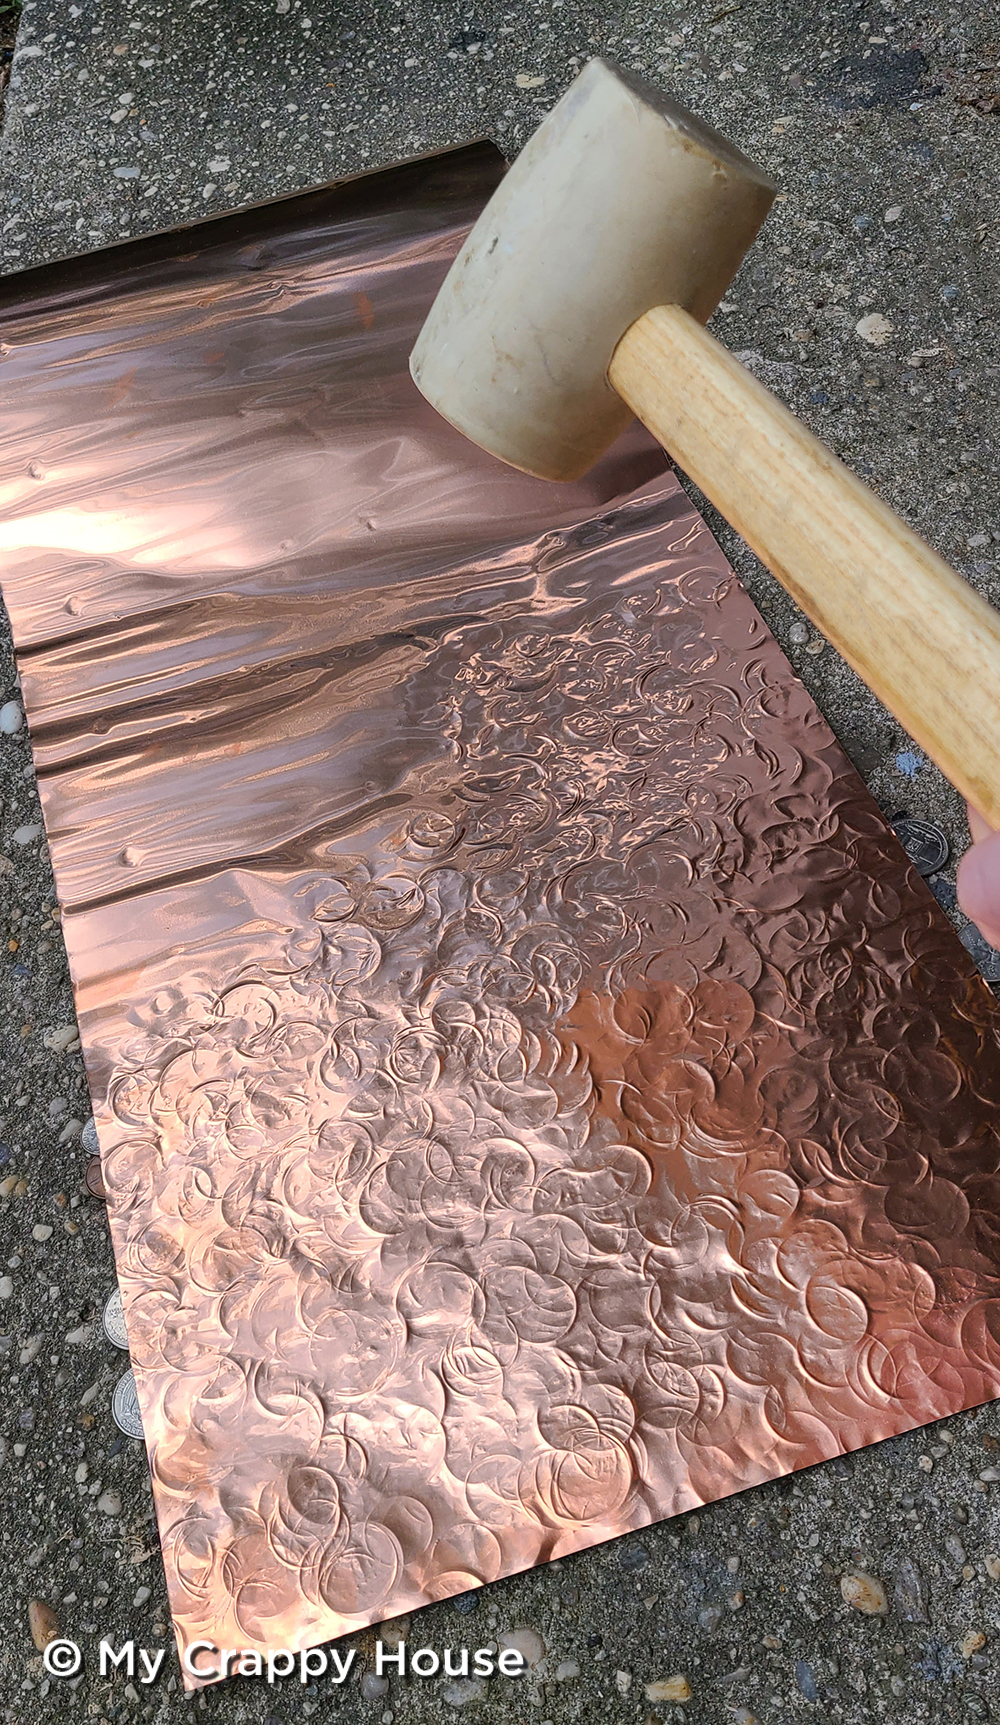
What you see in the photo above is 36 gauge (medium weight) copper that comes on a roll. (You should purchase it here because you’re totally gonna wanna do this project yourself. It’s so cool!) The metal is very soft and impressionable. (Kind of like today’s youth. They really should be taking shop class…)
The malleable nature of the copper means you can press (or hammer) a texture into it. I used coins, but you really could use anything bumpy. I’m not about to do your project for you, but if you want some random ideas off the top of my brain, try uncooked peas or rice, river rocks, puzzle pieces or maybe even tree bark. How about hardware, like washers or nuts? Think outside the box. Use your noodle. (Oh! Pasta! Yeah, that could work.)

I used a rubber mallet to get the texture I wanted. I just kept pushing my coins back into a pile and hammering the copper, section by section. How hard, you ask? Well, I pretended the coin pile was the year 2020 and then I tried to kill it. About that hard.
As if that weren’t cool enough, there’s more! The next step is to brush on this stuff called liver of sulfur. It totally smells like farts, so you’ll want to do this step outside.

The stuff looks like yellow rocks. Take a few of them and stir in some very hot water until they mostly dissolve. The liquid will be yellow, and, again, it will smell like farts.

Then, using a cheap bristle or foam brush, coat the copper in the liquid farts.
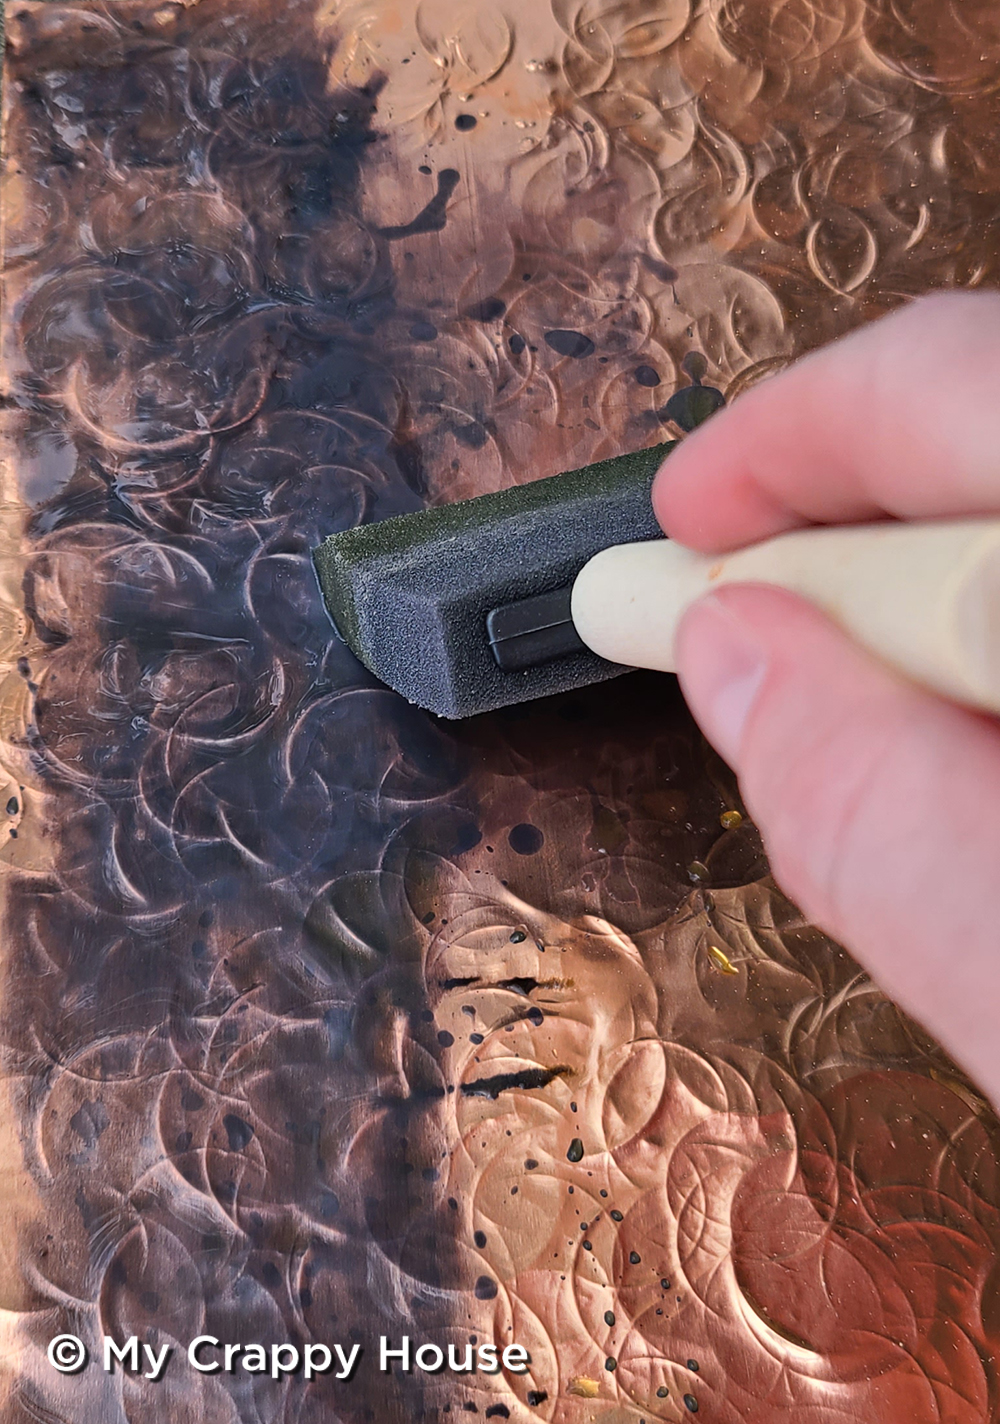
The copper will begin to turn black rather quickly because SCIENCE! (Of course, I can’t explain the science, but I’m almost positive that science is responsible for what happens.) Cool, right?

Now, it’s possible that you might be disappointed at the result when it dries and looks like this…

But don’t be! We’re still not done!
The next step is to take some fine grit sandpaper (I used 320) and lightly sand your project. The idea is to sand off the black on the high spots, but leave it be in the low spots, thus highlighting your cool texture.

You want to go slow here. Take your time so you don’t sand off too much. You don’t want to have to pull out the liquid farts again…

What a difference sanding makes! Now, clean off all of that black dust with a damp paper towel. We’re almost done!
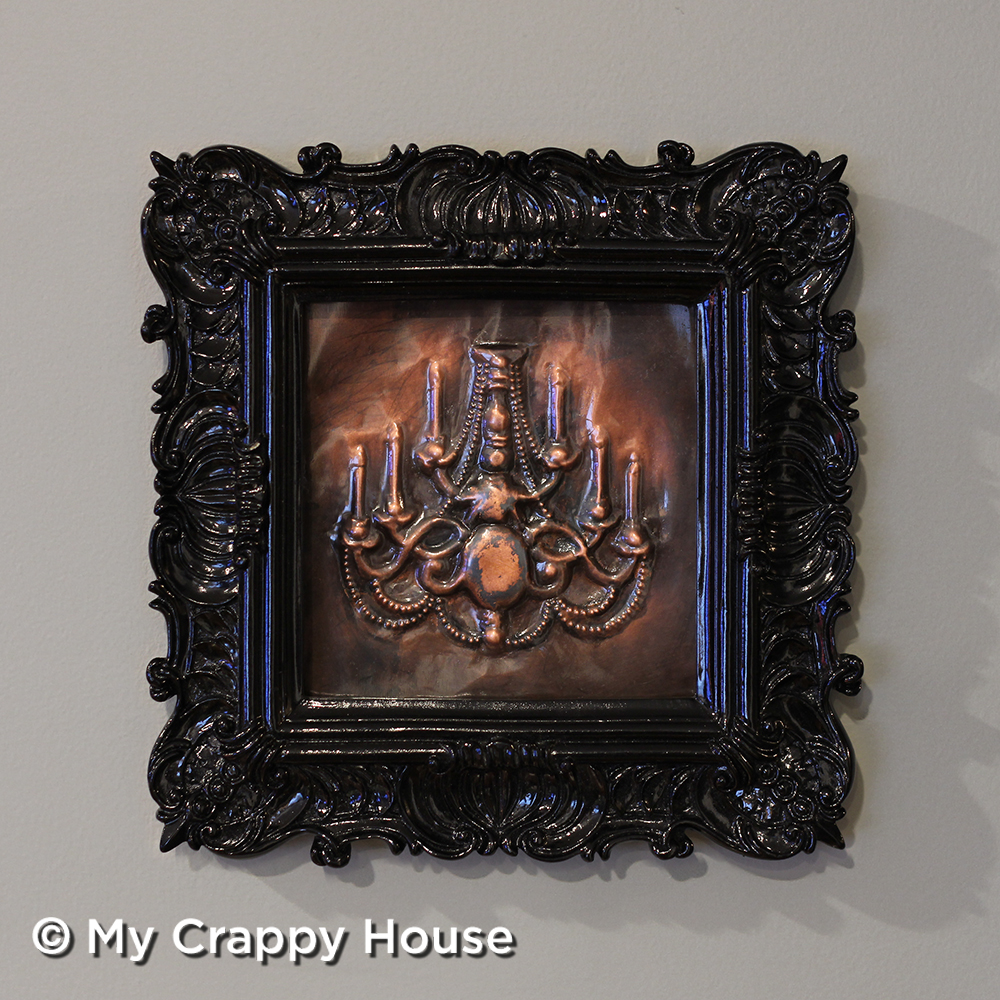
The last step is to seal it and get back that glossy, wet look. I used this wipe on poly…

You just wipe it on with a cloth (I used paper towels) and it comes out like this!

I know, right? Shop class! Mister Klahn!
So, here’s my copper contribution to Schmoo’s project, all assembled.

Any idea what he made? This feels like a good spot for a Pointless Poll.
Yeah, you know what it is…

Cool, right? He built it using these plans and red oak. We purchased this inexpensive dartboard and these darts to live inside the cabinet. It’ll go in the basement, once we finish it. (No, we didn’t start it yet. It’s an unstarted basement. We have yet to start to finish it.)

I hope you enjoyed this abstract interpretation of Mr. Klahn’s junior high metal shop project.
Wait, what? Abstract interpretation? Yes. Well, his original project was actually a bit more precise and artistic. Of course I’m going to show you what I mean.
In another post.
But here’s a preview…
Don’t be upset. It’s not like you have to wait or anything. You can read it right now. How great is instant gratification?
In that post, I’ll show you how to take these basic skills you just learned and create a beautiful piece of art. It’ll be like we traveled back in time to Mr. Klahn’s shop class thirty years ago. (We’ll be the oldest kids in the class…) So, crank up the Duran Duran and click here for the tutorial.
Also, you may want to subscribe (below) so you don’t miss out on any of the other fun stuff I post in my little corner of the interwebs. You’ll get a teeny, tiny, unobtrusive, little email, only when I post something new (which is about once a week.)
*This post contains affiliate links.


65 Comments
em
Dang nifty technique! And an entertaining telling o’the tale!
Mr. Klahn was a clever dude. I may have to try this…and not so I have a reason to stop blaming things on the dog.
Schmoop’s dartboard case is great…and well sized. Ours is much too tiny, thus the surrounding wall is in constant need of some spackle.
My Crappy House
I was noticing there’s not much room for off target dart throws with Schmoo’s cabinet either. My aim sucks, so his cabinet is going to get stabbed many, many times… What if you mounted a corkboard to the wall behind your cabinet? It’ll protect your wall and you can even tack up honey-do lists there for your mister…
Denise McCarthy
Thanks for this. I am a jewelry maker and have always love copper patina. My husband and I are redoing our stairs, and I was thinking of working some copper for the risers. Your article has made my vision more doable.
My Crappy House
Oh, that could be beautiful! You can get really creative with patterns you press into the copper. SUPER doable for stair risers!
L C
I needed this post SOOO much. It was brilliant, beautiful, AND made me laugh-out loud.
” Paint it in liquid farts”…made my day!!…???So-thank you..
My Crappy House
Boy am I late in responding, but… thank you! I’m glad you liked it
Pam
I really enjoyed this tutorial. My husband and I are building a shouse and I have been looking for pennant lights to go over the kitchen island. We decided to make them when we get moved in and can get to our tools.
We will weld metal bands for the top and bottom edges and rivet our copper panels to these. I already ordered the materials for the project and our shouse isn’t even done yet! Thanks for the great idea?
My Crappy House
That sounds AWESOME! Welding is one thing I’ve never had the opportunity to learn. I’d love to see how these turn out!
Jan Jones
Love your writing style!!!
My Crappy House
Thank you!!!
Joan
I LOVED shop class! We didn’t get to use too many power tools (we were only 12-13 year olds at the time. I guess they figured we weren’t mature enough to handle high powered, spinning blades at that age) but we did get to use a band saw. Go figure. We didn’t get to use copper, but we did learn the basics of leather working. Every now and then, I get a hankering to do some again. I recall it was fun. If only the tools weren’t so expensive…but, I digress. Shop and Home Ec should certainly be taught in school. Practical knowledge that gets WAY more use than much of the other crap they forced us to learn! Anyway, that is a really cool technique! Something that will be fermenting at the back of my mind that, when the right project comes along, I will become obsessed with doing!
My Crappy House
I think shop class and home economics are SO IMPORTANT! Teach kids how to do basic repairs and sew on a button, or learn about general finances. I wish I had learned how to create a budget when I was in high school. It may have saved me from getting myself into thousands of dollars in debt because I sucked at money management. But, hey. Good thing I learned how to dissect a frog…
Lisa B(ag)
LIQUID FARTS 2020!!
My Crappy House
Haha figures you’d land there…
Margaret A. Johnson
Great job Schmoo!!!! And as always, Vicki’s creativity never ceases to amaze me…..
My Crappy House
Thanks
Diane kelson
The “F” word was appalling…! I don’t think you needed to put it in your post especially that much, your project was admirable. Thought you would like to know.
My Crappy House
Aww, I’m sorry you were offended by my language. To be fair, I would never use the “real” F word in my posts. (I don’t even use the S word.) I’m sorry if this means we can’t be blog friends, but there are so many other DIY blogs (with less “personality” than I have) to choose from that you might find more enjoyable. Thank you for stopping by
Beth Pierce
I read through the post and could not find the *F* word that you, Diane Kelson, find so “appalling”. Unless you are referring to either her use of “freaking” or “farts,” which, in either case, makes you WAY too delicate to attempt a project that requires power tools. Good grief. Find something worthwhile to complain about.
My Crappy House
I appreciate the backup. As someone else mentioned, the name of my site is kind of a clue as to the tone, but I get that my personality may not be for everyone. I think Diane maybe thought she was being helpful, but I’m comfortable with the possibility of alienating a select few with my style. No hard feelings
Barbara H.
This is way, way cool! Both the cabinet and the copper – great job and I hope it means the basement will be coming along soon. Joan beat me to the punch with the idea that both Shop and Home Ec should be required. I was going to say how else will one learn how to write checks and balance a checkbook, but maybe those skills are on their way out, like cursive writing. But wait! Cursive might be on it’s way back!
My Crappy House
I hope they stop teaching cursive. Then it’ll be a code that only we will know… MUAHAHAHA… The basement is on the list, but I’m not sure when we’ll be getting to it. We’ve hit a life snag that I’ll be filling you guys in on, probably in my next post.
Mom
This is a freaking great post. The liquid farts would remind me of my NC water, which I don’t miss. I really love the look. I always wanted to play darts, maybe you should do the whole basement in cork. LOL
My Crappy House
Well, if you want to play, then yes. We’ll cork the whole damn wall…
Kaki Johnson
You do you boo! I think your terffic!
My Crappy House
Always! Thank you
Frances Rasmussen
Classy dart board cabinet! Good job all around.
My Crappy House
Thank you! I’ll tell Schmoo you liked it.
Jenn
Very cool project. I really like the look of the copper.
My Crappy House
Thank you! Such an easy project with an impressive pay off.
Kaz
Unreal love the end result and had a good laugh in the process..liquid farts and power watching TV lol ?
Just discovered you so now I’m intrigued and off to check out your ‘stuff’
Cheers..thanks for a great tutorial
Kaz from Oz ?
My Crappy House
Welcome! And thank you for compliments. I love those
Nancy Mesick
Love the idea but it’s the humor that grabbed me
My Crappy House
I try to make DIY funny. It’s kinda my thing. I’m glad you enjoyed it
Kathy Collum
Would you be able to apply this to your backsplash? Love the way it turned out and the color.
My Crappy House
I actually love that idea! I think, with proper planning, you could definitely do that. You’d have to buy a wider roll so that you could install it lengthwise to avoid seams. Please show me pictures if you do this! And feel free to message me if you have questions.
Sheree
I just love you!! You’re sense of humor and Every word are hilariously perfect. I’m new to your site. I read about your millionaire dad. He had you and that surely made him a millionaire and someone I would have truly loved to have met!!!! So that makes you a millionaire!!!!! If we could clone you and sprinkle your dust over the world , we’d all be in a happier place!!!! I know I will enjoy you commentary and any and all projects. Myself , yep a true McGuiver My friends always say ” Ask Sheree, if there is a solution or a way do do something, she’ll know!” I’d put that on my gravestone but way too long and then someone would probably say ” Well, I guess she didn’t know how to fix that?!” So I’m not going to give that last joke!! All McGiuvers go to heaven so I’m not going to mess with that , and anyway I want to meet your dad there and tell him wow! How wonderful his daughter still is because of him !! Can’t wait to read on!! You remind me of the author “Jenny Lawson”!!
Keep on ” Liking Life”
My Crappy House
Sheree, you are so sweet! What a nice comment! May this be a VERY long way off, but I love your gravestone idea
She could fix anything.*
*Almost.
Hahaha you made my day
Patsy
What in the world is DIANE KELSON’s problem? It is a wonder she even visits your site because it has the word “crappy”, you would think that word would curl her hair. I thought that using thr “F” word was appropriate. How else could you describe the smell and urge you followers to use outside. Really, as if she nevers “F”s.
My Crappy House
Haha I did wonder if she meant that F word…
Thanks for the laugh!
Charyl Greenia
I just came across your project and blog, love it! I have actually used this technique years ago on a much smaller scale for making jewelry. Recently pitches new house. Brand new, very boring. I want to do a backsplash in kitchen and around under all cupboards. I haven’t been able to find that “Yes” material, until now. Thank you! ❤ I love copper, my appliances are black and accessories are red, so copper is going to look great. I didn’t want neat, boring tiles so this fits the bill. Now to figure out how to attach to wall. Looking forward to more of your projects and the narrative.
My Crappy House
I really love this idea! Someone else in the comments here mentioned it too. I think it has so much potential to be awesome! If I were doing the project, I’d buy this roll because it’s 18″ wide by ten feet long, so you can avoid having any seams. I’d recommend construction adhesive to install because it’ll be permanent. But also, if you use construction adhesive, it’ll be permanent… Meaning you’ll most likely need to replace sheetrock if you ever decide to take it down. But who would want to take it down? It’s going to look amazing. Please share pictures if you do this!
HellsBells
I LOVE that you have stuff around waiting to be used for years and years. Is that really true – 25 years? Please say “Yes”! I have some amazing fabric that I am waiting for the right project to use it on. I bought it in Thailand in the mid 80’s. Maybe next year… .
Ps what is the ‘shop’ class about? What other stuff did you get to explore/get taught?
H, (UK)
My Crappy House
YES! It’s absolutely true! I had that copper for so long that the store I bought it from had long gone out of business. This is why I have such a hard time throwing things away. I really might use them someday! I hope you do finally use your 80s fabric and the project is awesome!
In my junior high, we had both metal and wood shop. Basically, they were classes meant to teach some basic crafting skills. I don’t remember too much, but metal shop was where I learned the copper technique. In wood shop, we made one of those IQ tests where you have a pyramid of pegs stuck into holes that you have to leapfrog until just one remains. Those classes are probably where I first used power tools by myself. My Crappy House origin story!
A. Esterly
I really like this copper technique! I saw it on Pinterest and popped over to see the post. The first thing I saw was Copper Boom! Which made me laugh, Thanks for that.
My Crappy House
Thank you! I love when “my people” find me
Laurie
I love this! I would like to do this on a copper mailbox. Does the wipe on poly protect outdoors?
My Crappy House
Hi! I’m glad you like the project. I wouldn’t suggest the wipe on poly for outdoor use, but there are many polyurethanes that are rated for the outside. I would just pick a clear, glossy one for weather-proofing and test it on a scrap piece to make sure you like the look. I’d love to see how it turns out. Please share a picture!
Charlee Hunter
I absolutely adore your writing style.. of course that may be because mine is so very similar! lol This project is spectacular and I cannot wait to try it (so not looking forward to the ‘fart’ part! I need to remember to purchse vicks…). I have a coffee bar just looking for an awesome technique… Thanks for the inspo!
My Crappy House
Thank you! I was just working with the “liquid farts” yesterday and my husband thought one of the cats had an incident… Good luck with your project. Send me pictures. I’d love to see!
Shirley
This is phenomenal! I remember doing something like this in shop class but nothing this big. Can’t remember what I made, I think it was a hanging light but I’m not sure because that was 50 years ago…lol! Maybe it was candle holders..hmm. Anyway, I freakin’ love the cabinet! I read some of your post and like what I see so far so I will subscribe here in a minute and check things out. I need to get some copper! ????
My Crappy House
Thank you so much! I did the copper part, but my honey built this cabinet. (Not that I couldn’t have built this cabinet, but he’s the one who’s into the dart thing. My aim sucks.) Anyway, I hope you enjoy My Crappy House!
Frances
Absolutely love your writing style! It matches the way I think. Awesome copper bashing, just a great result. That description of the sulfur is spot on. So glad I found this. Keep on keeping us amused and wanting more.
My Crappy House
If I write the way you think, then you must be wicked smart because I also write the way I think… This makes perfect sense because my readers tend to be of superior intelligence. Welcome!
Mona Arnott
Just found this post now. Gotta love good old Pinterest.
The one thing I noticed is that you do mention neutralizing the liver of Sulphur to stop the colour change. If it’s not neutralized the colour will continue to darken, even after it has dried. This article explains it best, https://pin.it/76V2rpX (Beadaholic, “Product Guide: How to Use Liver of Sulphur” in case it didn’t link properly).
Just curious about how your lovely copper looks now, 3 years later. I love the look and hope you’re still happy with it.
And btw LOS smells worse than farts to me anyway.
My Crappy House
Hey, thanks for commenting. In FEBRUARY. It’s now October and I’m just finally getting around to replies. I know, I suck.
I actually did NOT know about neutralizing the sulphur, but sealing it with the poly must do that because the pieces I have done all look the same as the day I finished them.
And, yes. LOS should never be used indoors, unless you’re moving and you hate the new owners of your house.
Johanna
This was brilliant and would look great on a front door, shutters and ceiling in a kitchen and or bathroom framed with thin stained wood beams.
My Crappy House
All great ideas! So many applications for this technique. Since it’s now October and you commented in April, I hope you’ve tried some of them and they came out fabulous.
Birkha RÖSSIG
Mir gefallen solche Beiträge immer und ich denke, die Ausdrücke sind absolut passend! Immer toll, wenn sich jemand die Arbeit macht, Andere zu inspirieren. Einziger Kritikpunkt…Schwefelleber und der Umgang damit. Das sollte man schon erwähnen.
Giftig bei Verschlucken. H311: Giftig bei Hautkontakt. H314: Verursacht schwere Verätzungen der Haut und schwere Augenschäden. Also ist immer auch sowas zu erwähnen. Freundliche Grüsse
sam spade
This was what we were doing in art class the day Kennedy was shot. Glad to see good ideas are still around.
My Crappy House
Oh, wow. That’s a moment you won’t forget! I do hope they’re still doing cool projects like these in shop class.
Maggie campbell
Great to find a human at the end of this fing love how you’re brain works looking forward to more awesomeness ,blessings from Britain
My Crappy House
Yep, still 100% human here. Thanks for noticing! And for complimenting my brain. I love when that happens. I’m so happy to be blessed from Britain! Blessings right back at you
Melissa Meade
Hi I just wanted to thank you; I did your hammered copper technique and it worked exactly as you said it would. A lot of people leave things out to make themselves look better but you are for real and I love that
My Crappy House
I’m so happy to hear you tried the project and it worked out for you! Thank you so much for taking the time to let me know. Also, I appreciate you noticing my realness. Realitude. Real deality. I wouldn’t have it any other way