

How to Install Drawer Faces
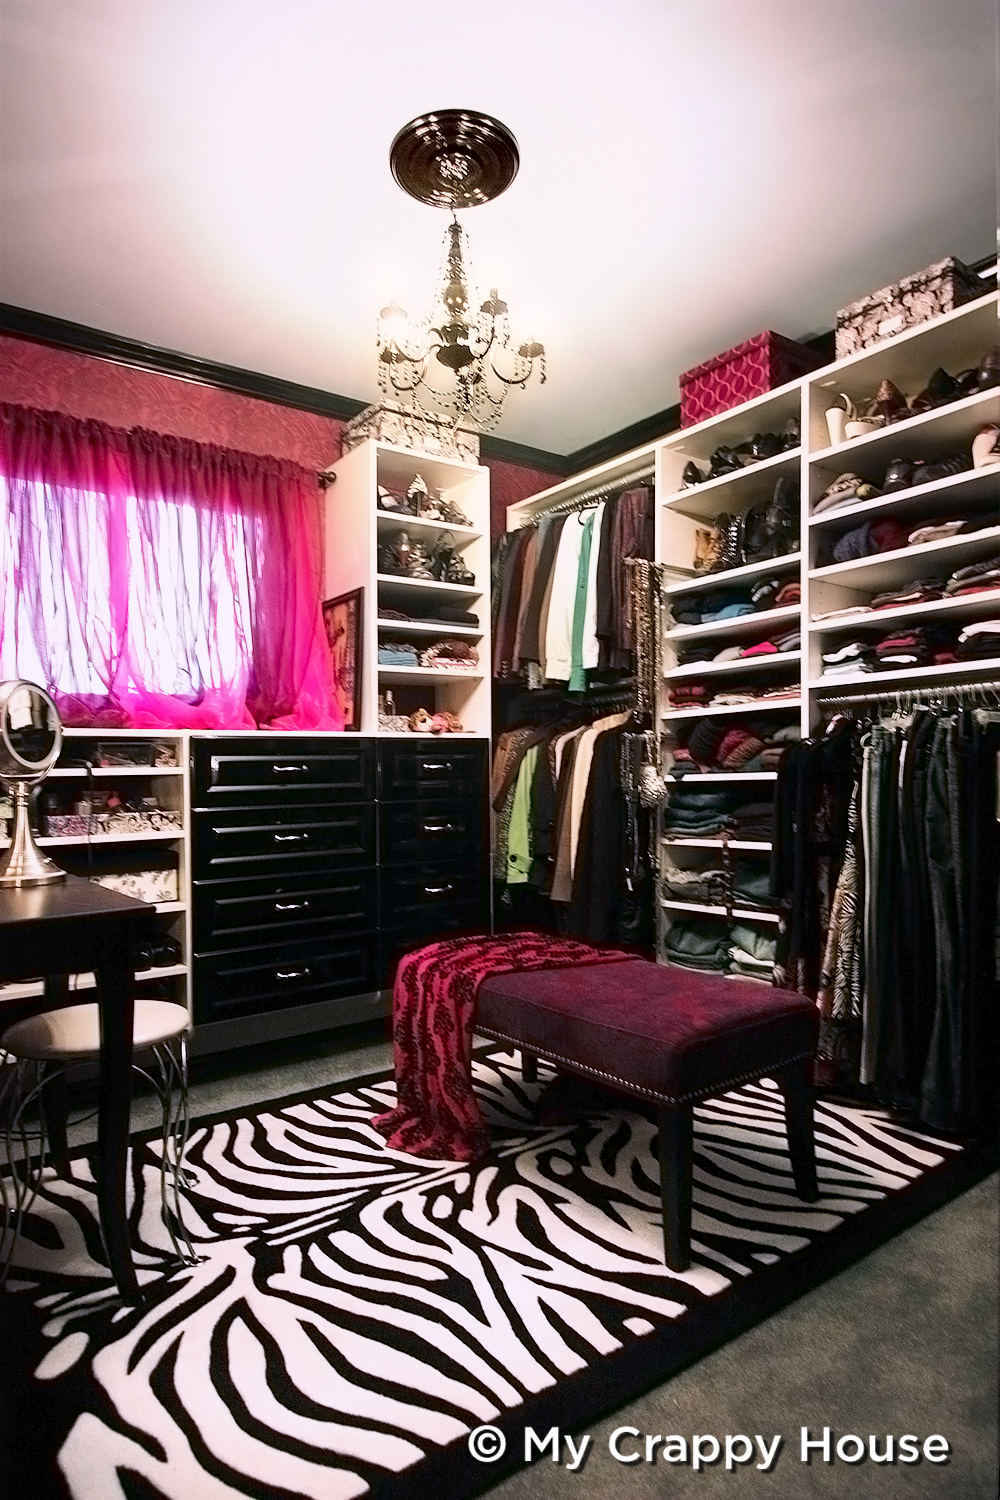
It’s a Dressing Room Update!
I write a lot of fantastic posts (Hey, that’s why you’re here, right? That, and my charming personality…), but one of my favorite posts has to be the one that’s all about my dressing room. (If you haven’t read it, please go do that now. I promise you, it’s worth the click. Seriously. Come back here when you’re done.) In that ridiculously entertaining post, I talked about how to install drawer faces, but I’m going to get into even more detail in this post because THIS (*pause for dramatic effect…*) is a dressing room update.

If you’re good at following directions, then you just finished reading my last dressing room post and you know all about how I came to have a whole, entire bedroom dedicated to my clothes. (And you get a cookie.) So, this post is about the changes I had to make when Schmoopy moved in with me. I mean, it’s only fair that he has a place to put his clothes, right?
No, really. I’m asking.
So, how did I make room? The first thing I did was try on every single piece of clothing that I owned and donate the stuff that did not spark joy.
Just kidding. I keep lots of things that don’t spark joy, but I did donate the stuff that was closer to fitting my eight-year-old niece than me, the ugly “wtf was I thinking?” stuff, and the too-short skirts that I had no business wearing at my age. That freed up a tiny bit of space, but not nearly enough. (Guys, those skirts were really small.)

Told you.
I shuffled and squished, but, sadly, there was only one area I could think of to add more closet space.
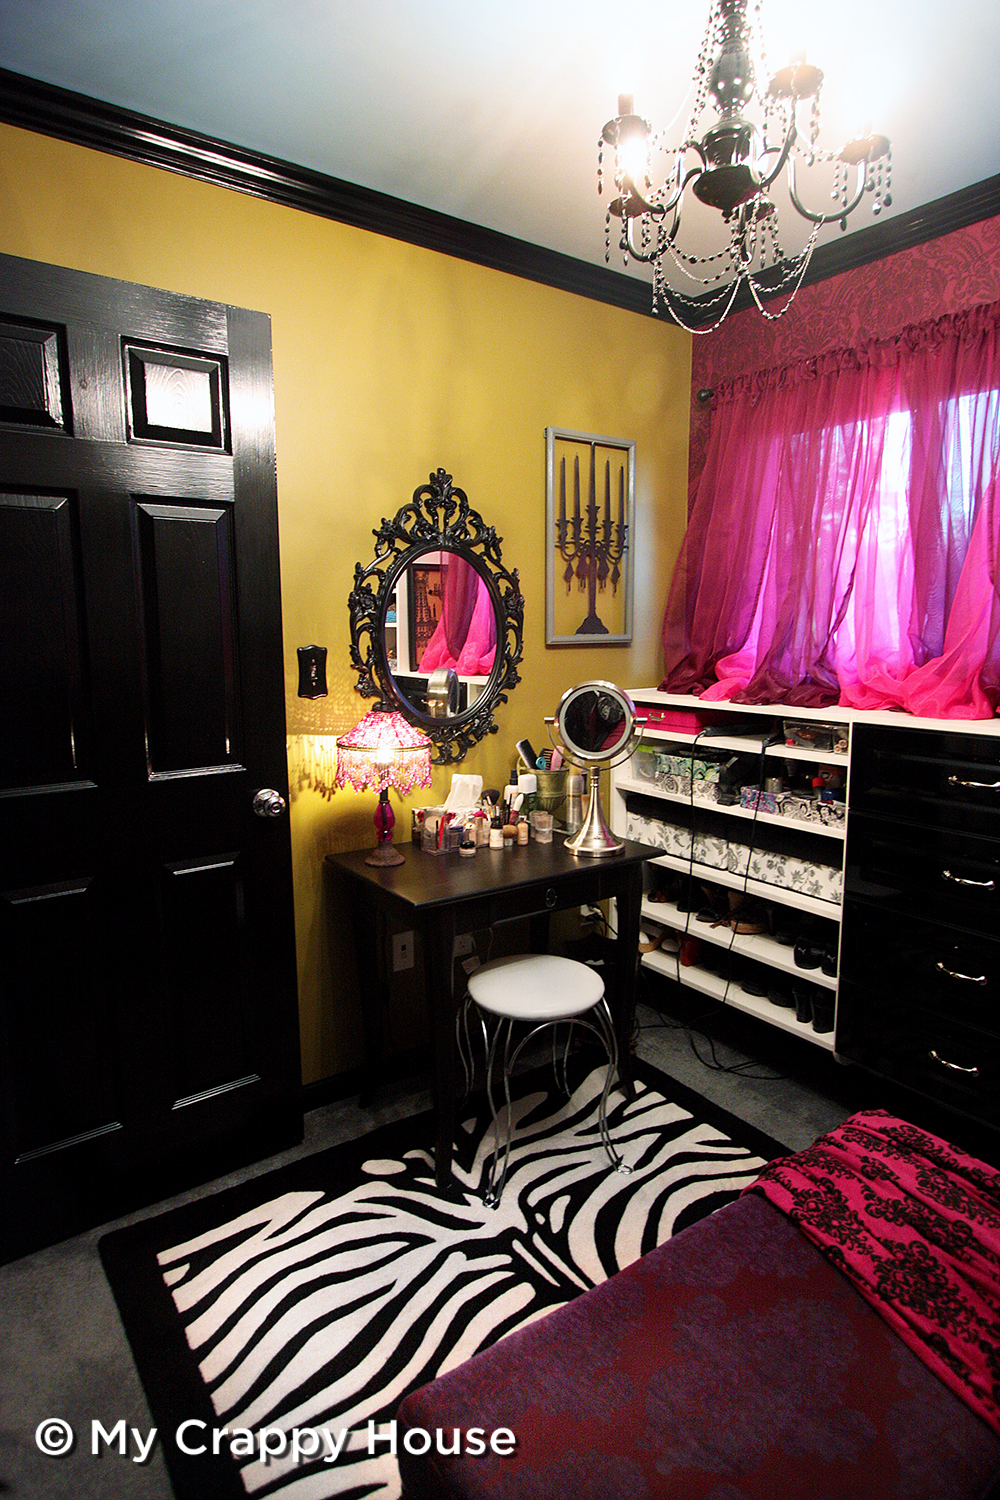
My vanity. I know! I used to love making myself look pretty whilst sitting at my pretty vanity that fit so perfectly in my pretty dressing room. I must really love Schmoopy because I gave all that up for him. Love is sacrifice, right?
No, really. I’m asking.
My Honey needed a place for his suits, so I repurposed the shelving section under the window and installed a bar for hanging. I mean, without my vanity, it’s not like my hair tools and makeup products needed to live there anymore. (*sniff*)
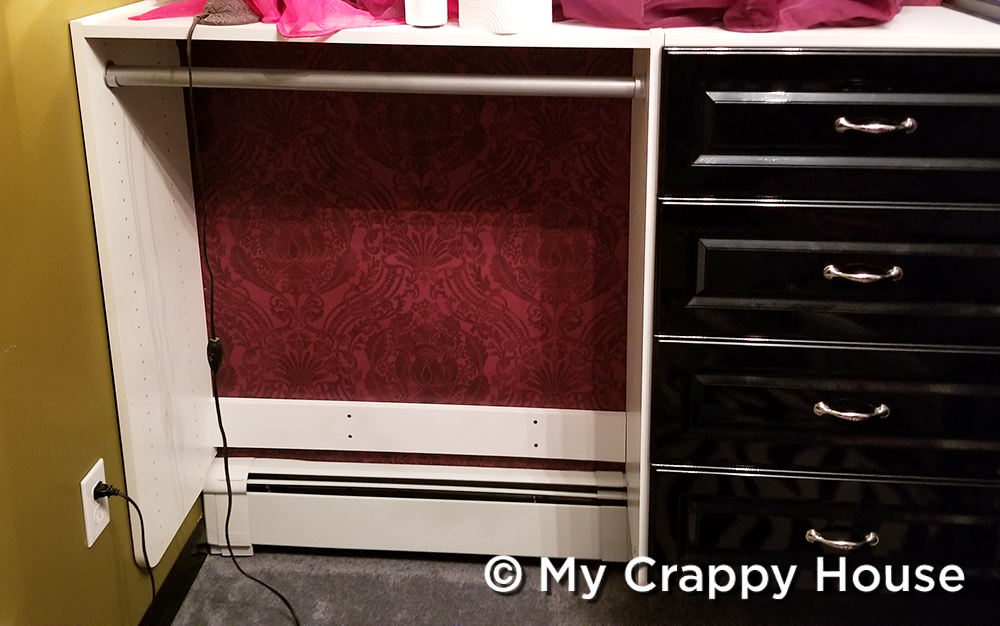

So, with the vanity gone, I had room to add a section of drawers and shelving for my Honey’s stuff. You can totally build something like this from scratch (Or not. I have no idea what you’re capable of.), but it was quicker (probably not cheaper) for me to use a local closet company.
Unfortunately, I wasn’t as lucky as last time in the closet parts procurement department. (I know you know what I’m referring to because you read my last post, right? Yeah, ya did! Have another cookie.)
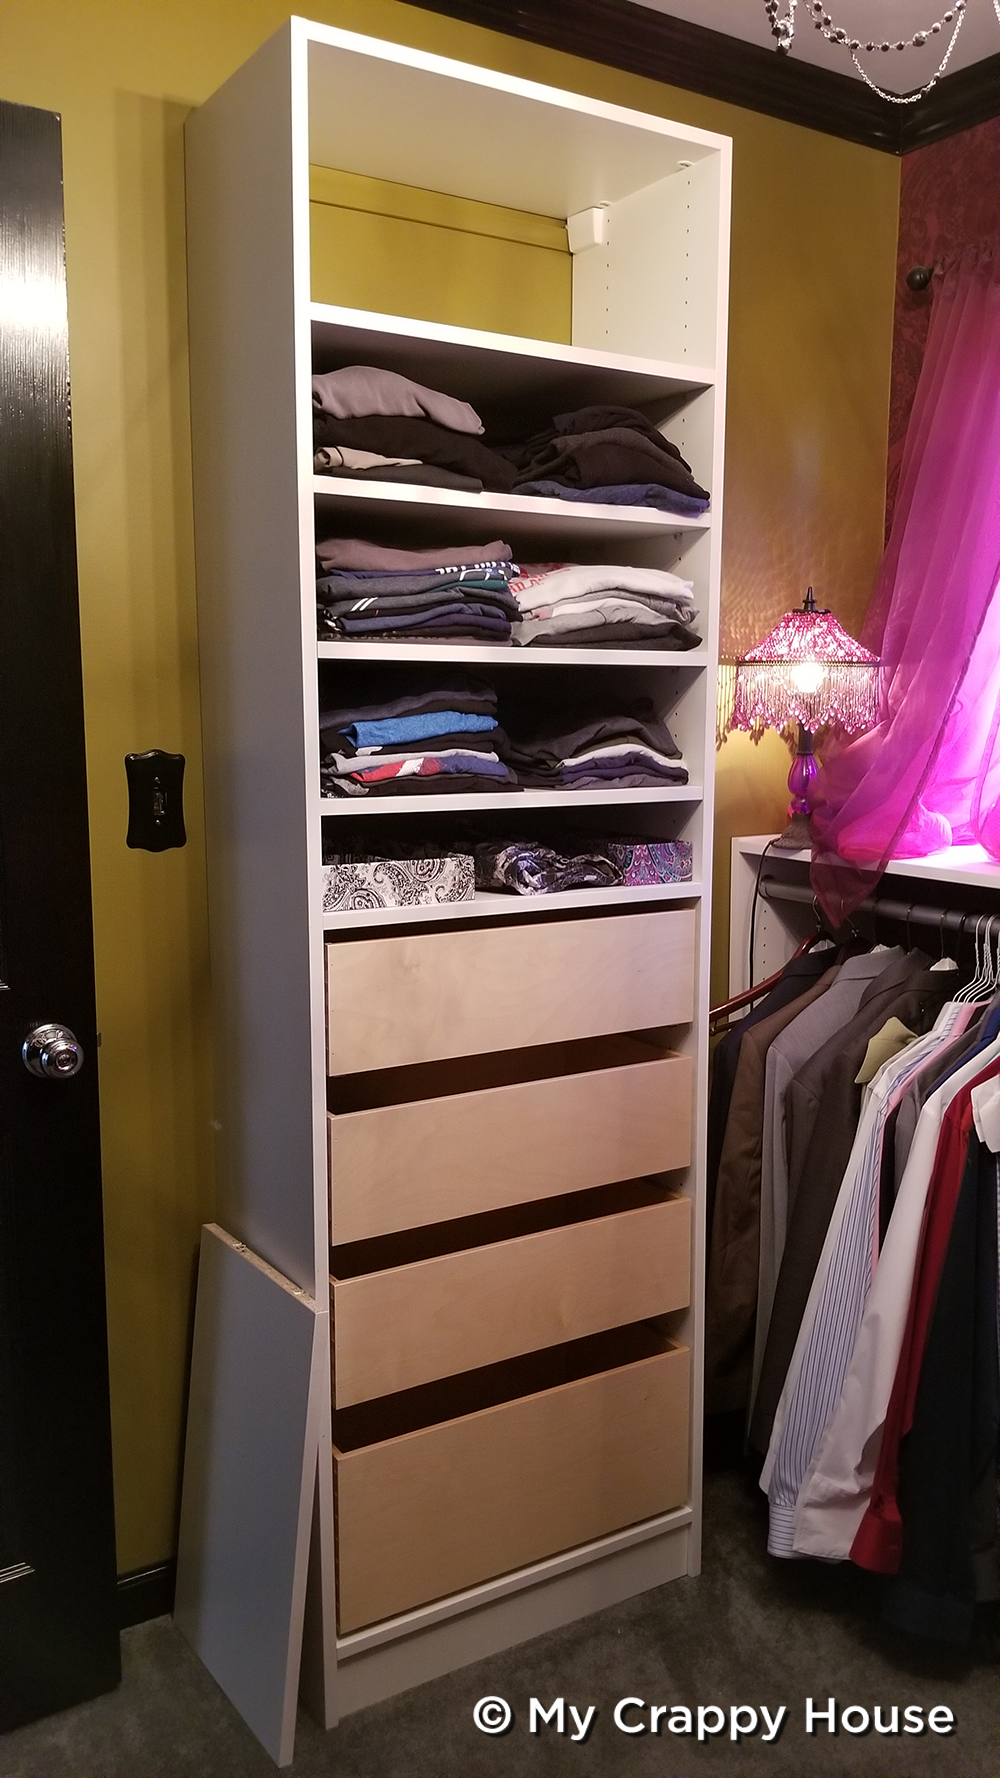
Since I wanted the drawer faces to match what was already existing, I bought them separately from the same local cabinet maker as last time and installed them myself. Here’s a step by step of how I install drawer faces, because I am all about the tutorials. (No, not really, but I want you to like me.)
To start, I measured where the handle holes would go and pre-drilled them on every face.

Next, starting from the bottom, I clamped a face in place in the exact right spot, which is overlapping the bottom shelf and sides by about 3/8 of an inch. I used a stack of books to support the face while I leveled it out. Then, I drilled right through my pre-drilled holes and into the drawer box.
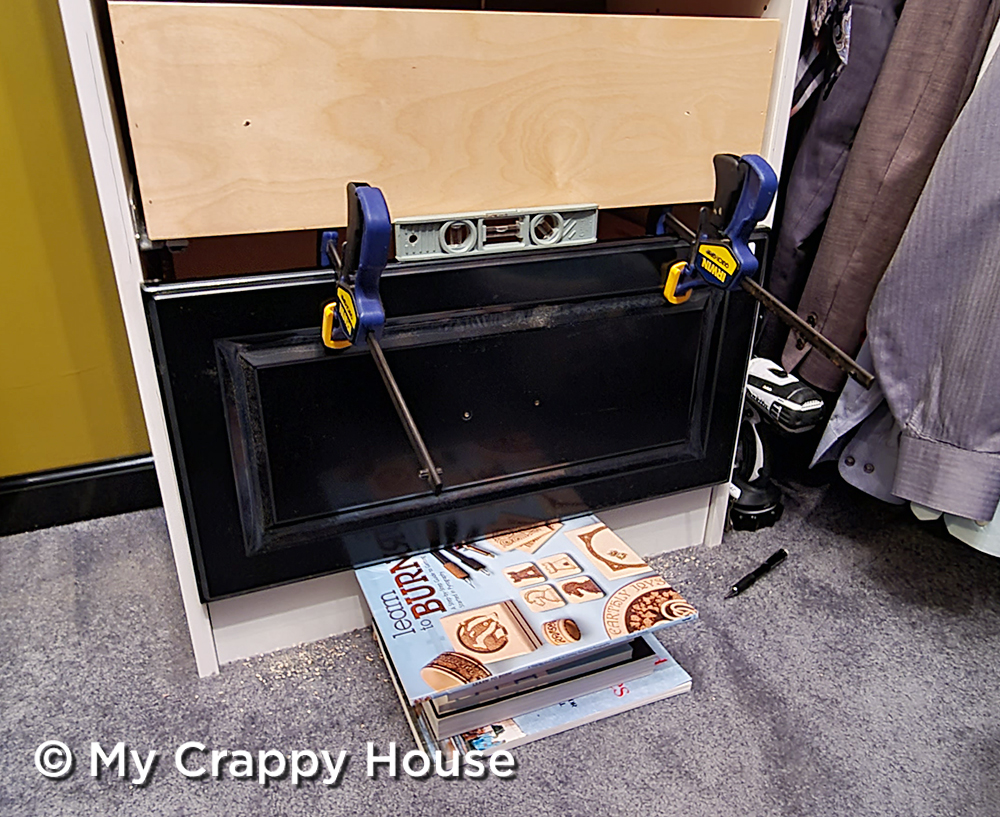
I guess you could screw your handle on at this point to help keep your face in place, but it should not be the only thing attaching it to the drawer box. You need to drill a couple of holes from the inside of the drawer into the face. Be very careful when you do this part so you don’t drill straight through the front. If you’re gonna F this up, this is probably where it’ll happen, so pay attention!
I put a piece of tape on my drill bit to let me know how deep I could go without popping through the face. Also, if you have raised panel fronts like I do, you want to make sure you drill into the thickest part of the face and not the recessed detail.
You’re gonna hate yourself if you drill through your drawer face, so take it slow and FOCUS.

The next drawers are easier. Place a spacer – something rigid that’s about 1/16 of an inch thick – on top of the bottom drawer edge, then set your next face on top of that. Level and clamp it in place, then follow the same instructions as above. Don’t make me write them again. You can scroll up, lazy bones.

Once you get all of your faces attached, it’s time for the most satisfying part of the project…
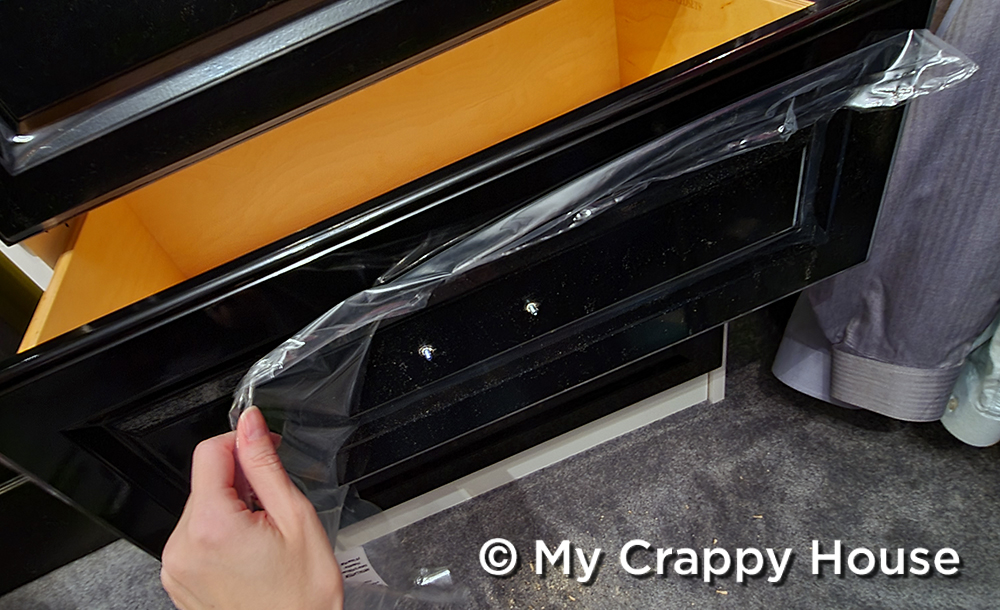
Ahhhh! Don’t you just love to peel off protective plastic? Unless you’re one of those weirdos who leaves the plastic on your microwave clock for ten years and gets mad when anyone tries to peel it off for you. In that case, what’s wrong with you?
No, really. I’m asking.
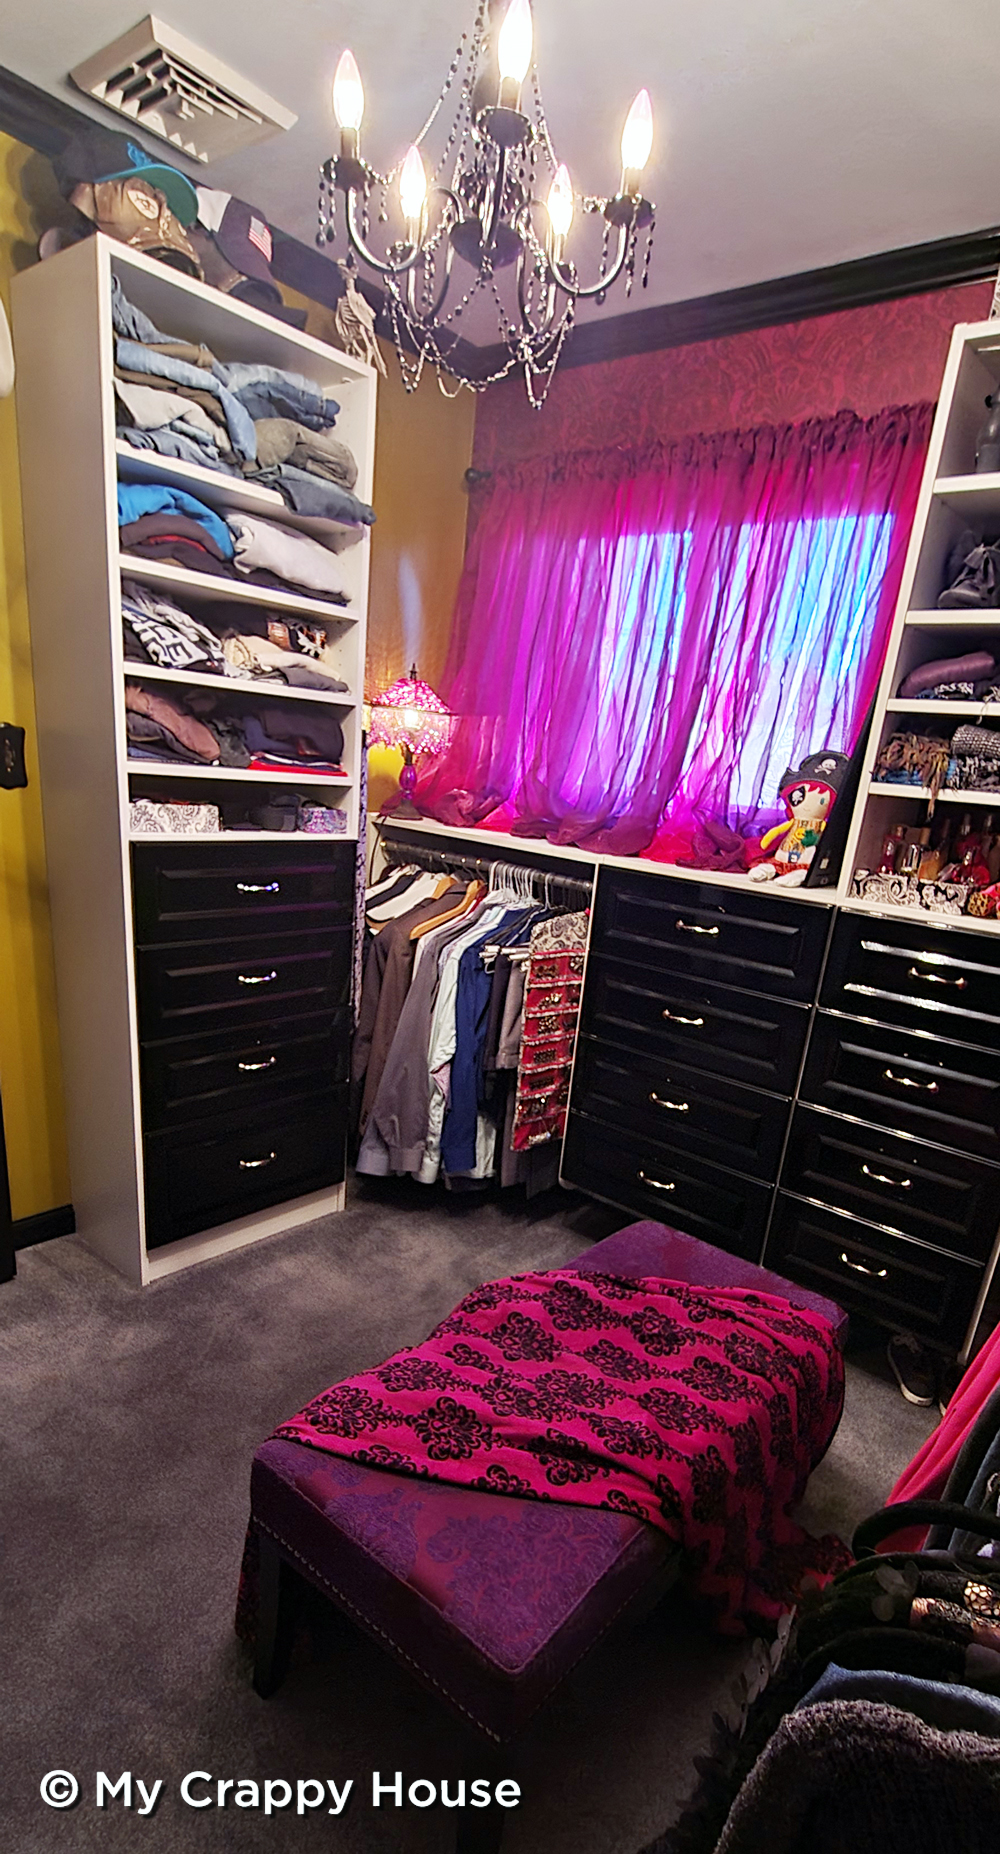
Guys, we’re almost done here. I’ve just got a few more pictures to show you of how the room looks now. Here’s the drawer bank, complete with faces. Hey, look! They’re smiling!
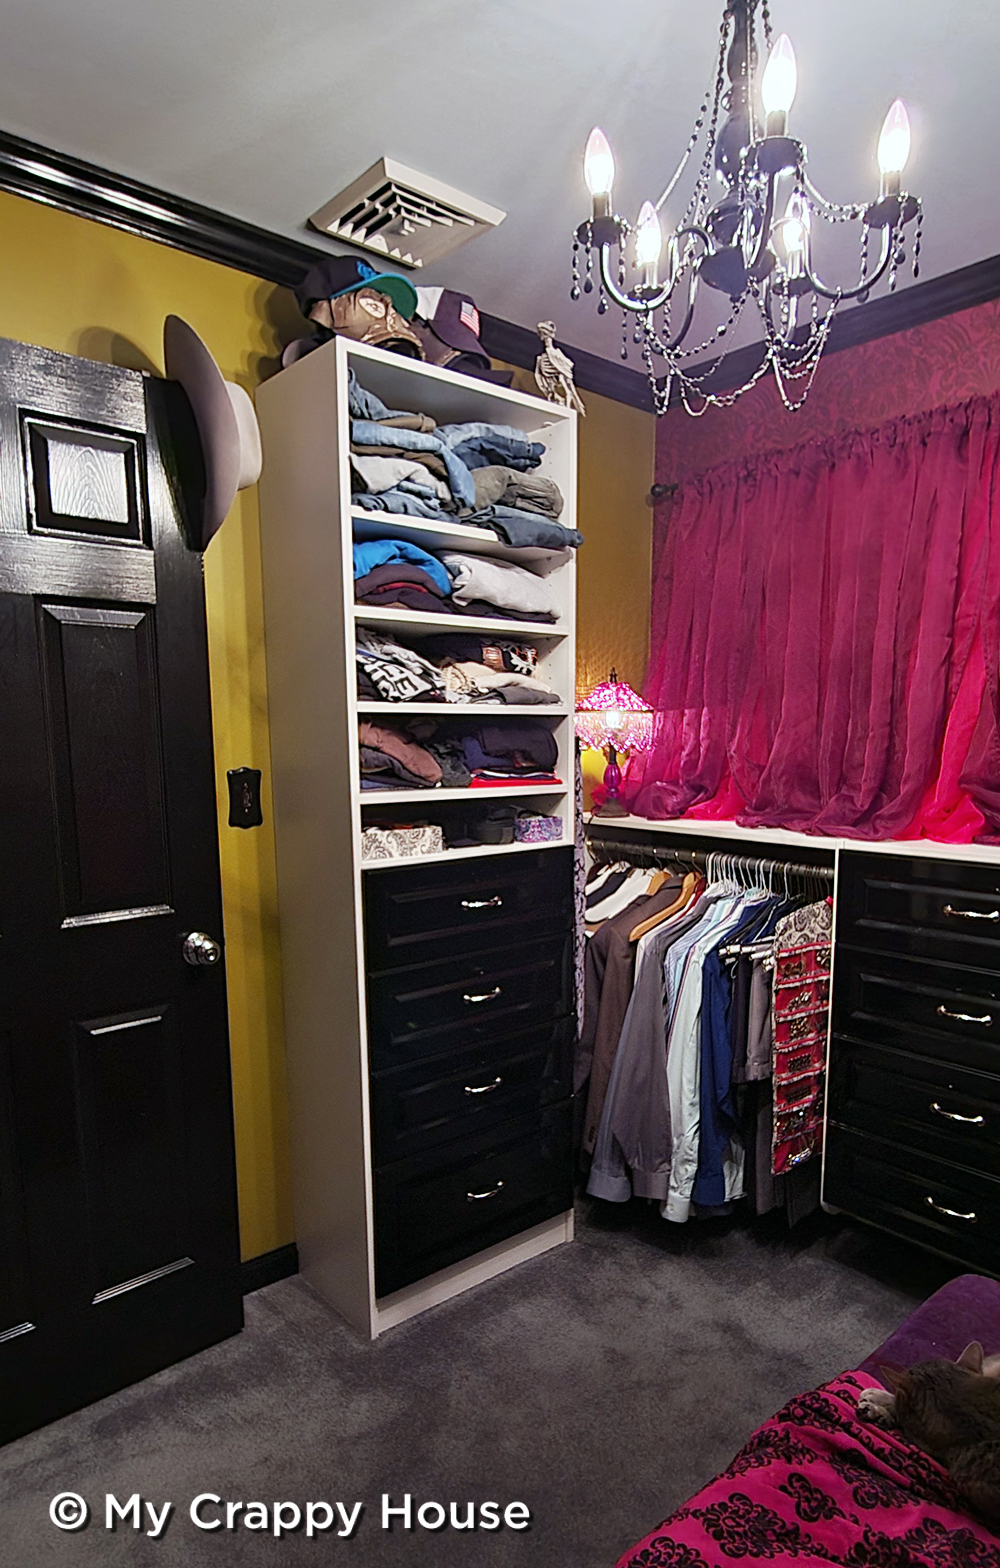
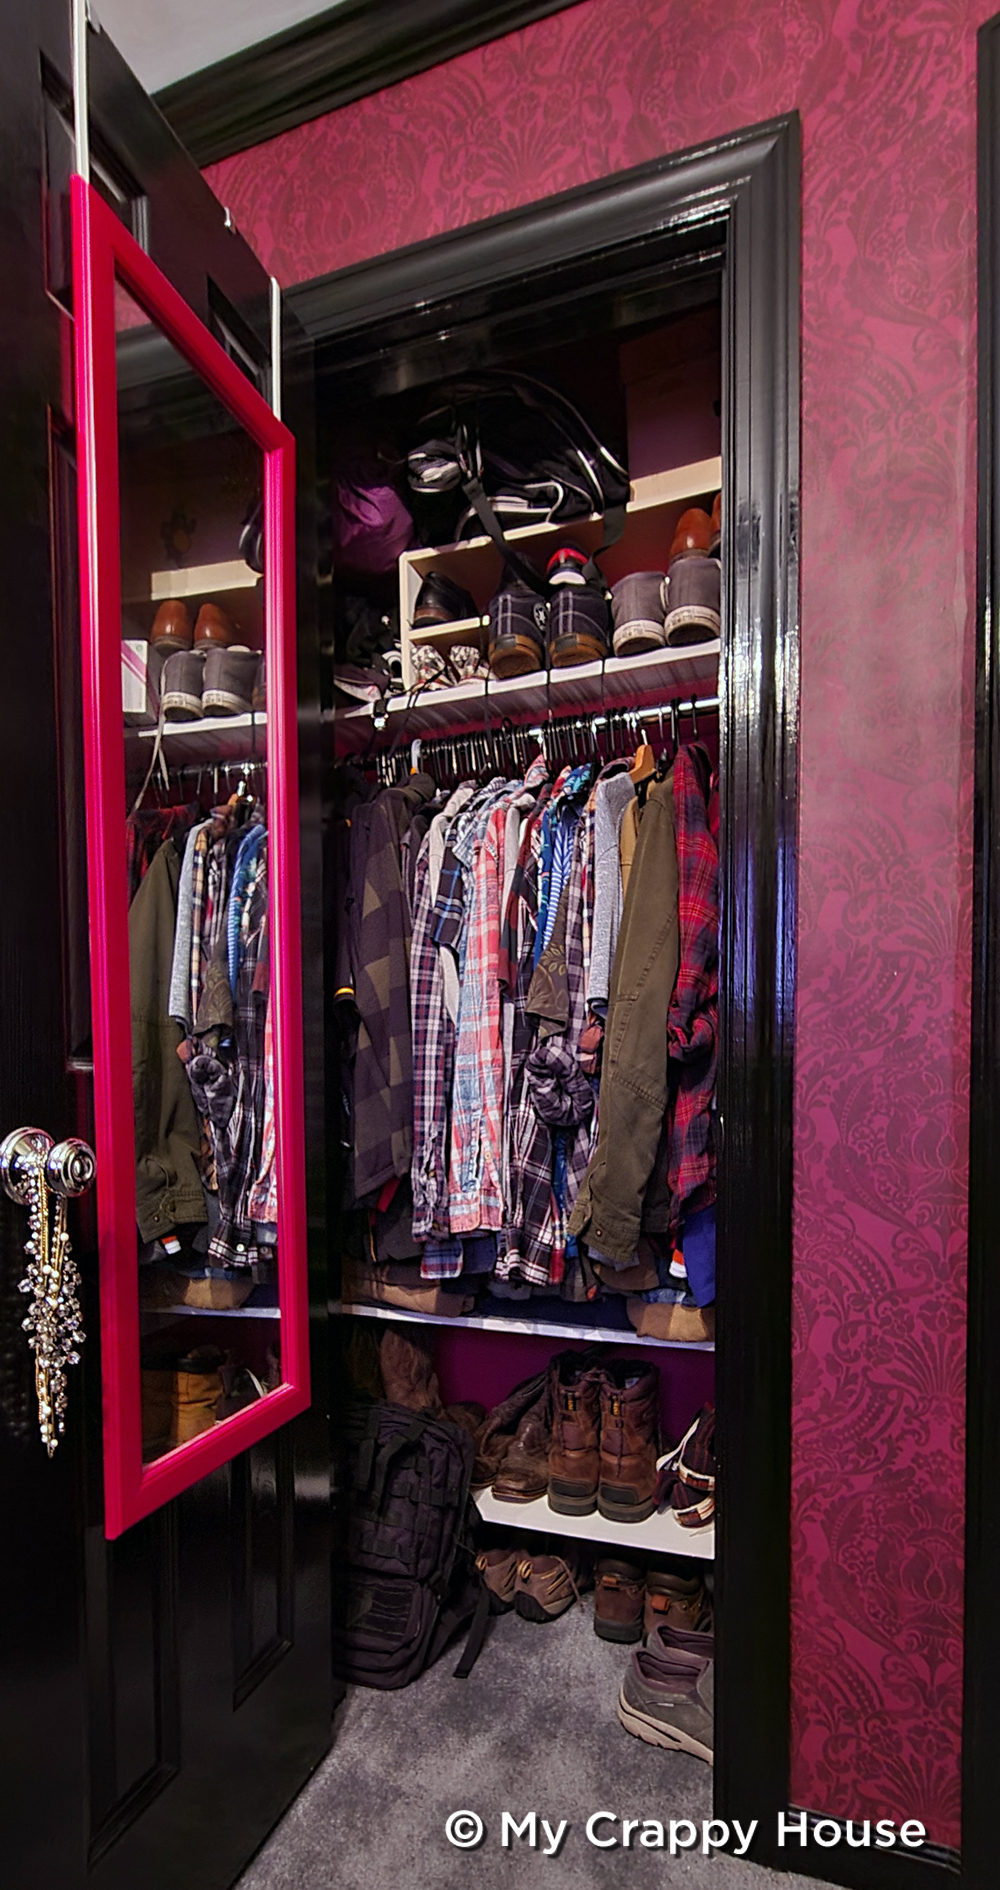
And this is the closet within the closet (remember, this was originally a bedroom), which I also gave to Schmoopy. He added some shelves for his shoes.
Here are a couple of side by side before and afters.

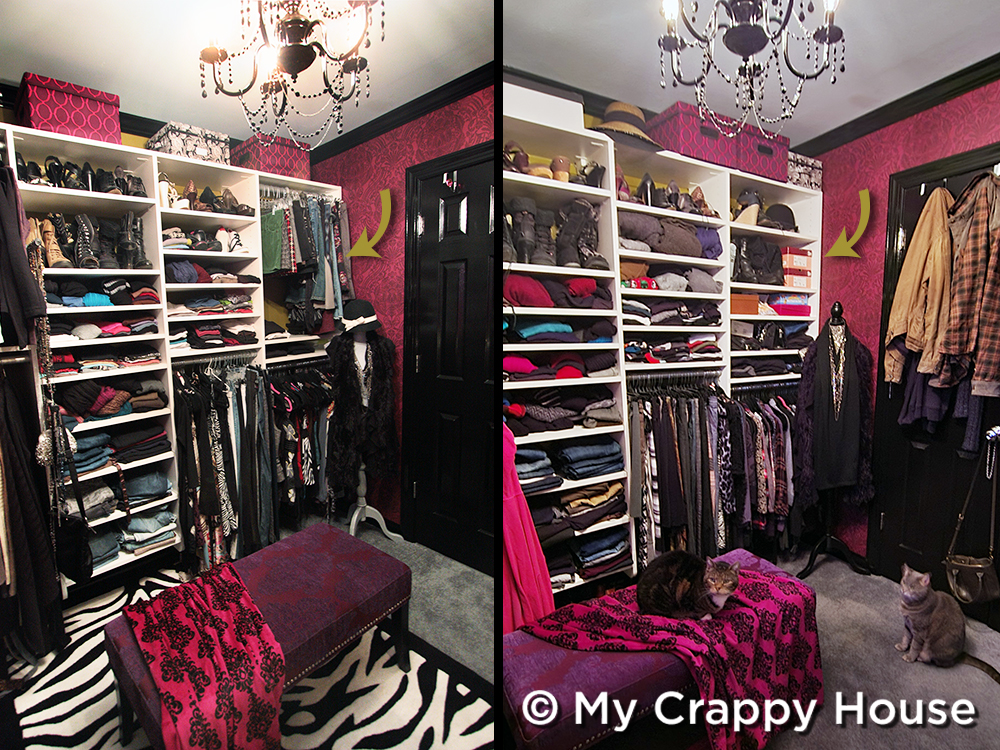
You can see where I replaced one of my hanging sections with shelves. I put arrows. See them? And you might have noticed the zebra rug is gone now. I really loved that rug, but it just got so dirty, I had to let it go. That was a sad day. And, also, cats! They love to hang out in the dressing room. (Maybe that’s why the rug got so dirty. I love my babies, but damn, cats are gross.)

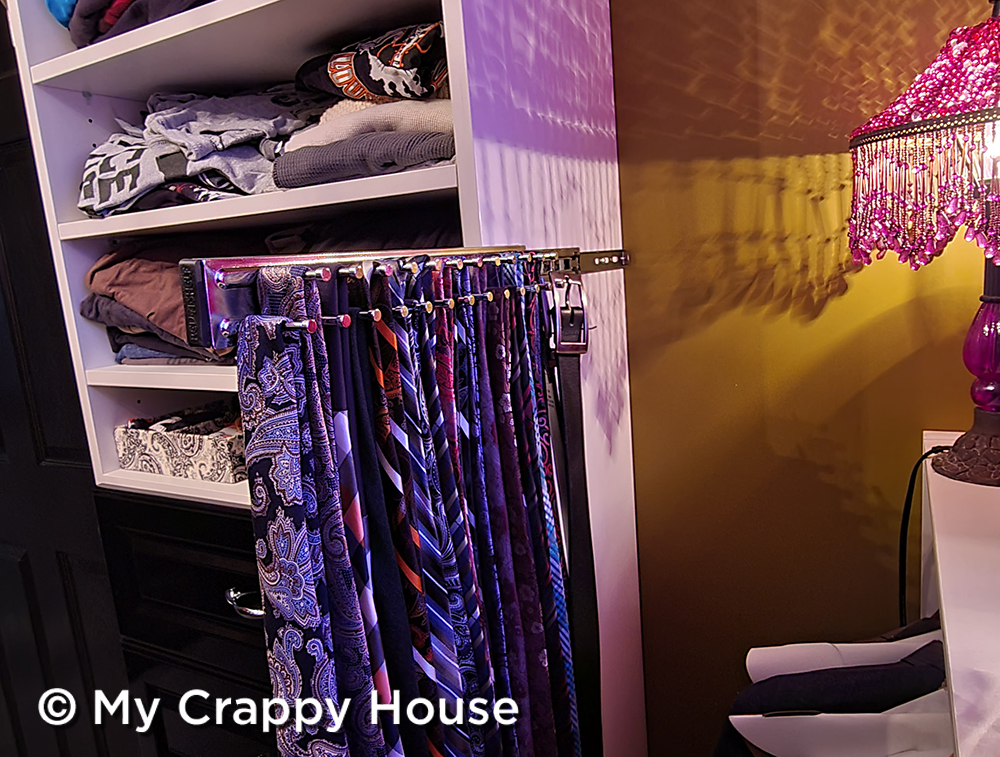
Schmoopy wears suits a few days a week, so we added this tie rack on the side of his section. It extends when he needs to look fancy and slides out of the way when he doesn’t.
This cutie lives in here and was made by my talented Aunt Teena. She has a small business creating handmade dolls and pocketbooks. Check out her Facebook page if you’re looking for one of a kind hand-sewn gifts. Her work is immaculate.

So, there you have it. An exhaustive update on the dressing room (which I left out of the house tour from a few weeks back). I hope you enjoyed it.
If you liked this post, why not share it with a friend who also digs really cool closets? And don’t forget to subscribe below…

***Time travel links! If you like closets (and who doesn’t!), check out this closet makeover I did with my BFF on a budget.
*This post contains affiliate links.


14 Comments
Joan
Nicely done! Where did you end up putting your vanity?
My Crappy House
The vanity is in our bedroom now. I tried to do my makeup in the bathroom, but I just couldn’t see wtf I was doing. Chandelier lighting looks really pretty, but it’s not conducive at all to makeup application.
em
You are a good woman, sharing your sanctuary with the Schmoop. And he is a good man, wearing your skirts for our entertainment (I think some people do that professionally, btw. Is that okay to say?)
I was dutiful, as you would guess, and read the linked post. Which came first, your dressing room decor or your blog branding? Inquiring minds…
My daughter recently moved into a house with three bedrooms and had the same idea as you…but not the drive or the knowhow. I will DEFinitely be sharing this with her. You did an amazing job, both in maximizing your storage, construction techniques and decorating it to be a comfortable and fun space!
My Crappy House
Yeah, we’ve got a good yin-yang thing going on over here. I think that picture was the result of my telling him there was no way he could fit into one of those skirts. He showed me… There’s a video. Maybe I’ll replace the photo with a GIF at some point.
The dressing room came before the blog. Why do you ask?
Ha, just kidding. I totally used my dressing room for inspiration when I designed my blog. So, I guess I was inspired by… myself.
Good luck to your daughter! Honestly, she really could transform a bedroom into a closet just using closest organizer kits from Home Depot or Lowes. It won’t look as “polished”, but they’ll help her organize all of her crap without too much trouble. I have another closet post where I helped my best friend transform hers. We did it on a tight budget, so maybe she can get some inspiration from that one.
Trollopian
I came for the cats. And I was satisfied!
My Crappy House
Happy to oblige!
SusieQ
OMG! Schmoopy boy in the skirt! Yeah, he’s a keeper! Love the new closet with added space for your love, but seriously, girl, is PINK his color??????
And the furry children……..oh my! LOVE them!
My Crappy House
Ha, he’s cool with the pink. He’s just happy he has his own section!
MARY LEE MASSIEON
I’m with Joan, where did you put your vanity and makeup? Love all the great progress you’ve made and it’s a great sign you’re makin room for the love of your new life. Way to go and much happiness!!!!
My Crappy House
Thank you! Yeah, it’s definitely “our” house now.
I do my makeup in the bedroom now. I tried the bathroom, but it’s too dark in there. I’d put my makeup on and think it looked great, then go outside and see it in the sunlight and… oh no! Not good. So I set the vanity up in the bedroom with a lighted mirror.
Barbara H.
Good job! Very thoughtful of you to make room for him and yes, cats are gross but I love them – just not in the middle of the night when dangerous erping sounds come from the end of the bed. I was too lazy to follow the link to the old post but now I’ll take the time. I may have read it already but that was long ago and the memory isn’t what it used to be.
My Crappy House
I wish the cat sounds would come from the end of the bed. Egor is very good, sleeping by my feet, but Zero insists on sleeping on my head. That’s why we can’t have them sleep with us. He’s also guilty of kitty conversations at 4 a.m.
Barbara H.
Hmm – maybe I didn’t read the first post – if I did I didn’t leave a comment but I was shy about there for a long time on many blogs. Don’t remember how I found you but perhaps, as with another reader who DID post a comment, it was through VEB, another blogger who doesn’t post nearly often enough. So glad you have changed your ways and gone to the weekly format. Very impressed with your skills, especially being able to use a CNC machine. Sawdust Girl recently got one and it sounded kind of complicated to learn. Okay, I’ll shut up now.
My Crappy House
I like Victoria. I found her on Apartment Therapy in their comments section. I guess I should get out and comment more in the blog world. It’s a great way to help people find me. I’m glad you did find me and have stuck around all of these years. It means a lot to know people care about what I’m doing over here. Thank you
And WOW, CNC machines are so expensive. I can’t believe she bought one! I’ll have to go check it out.